

Starter kit · Hair salons and stylists
Starting a hair salon?
Here are the first steps, straight from the official sources. Then grab a free app where clients book and pay online, so a no-show is still a paid chair.
Free to start · No credit card · Live in about 15 minutes
The first steps
Most people starting out in hair work as a sole trader, from a small salon, a rented chair, a room at home or a mobile kit. These are the registrations and checks that usually come first. The licence and hygiene steps are for Queensland.
Step 1
Get an ABN
An Australian Business Number is free through the Australian Business Register. You quote it on your invoices.
Register for an ABN (business.gov.au)(opens in a new tab)Step 2
Register a business name, if you need one
ASIC says you must register a business name if you run a business in Australia and are not trading under your own name.
Register a business name (ASIC)(opens in a new tab)Step 3
Know when GST starts
You must register for GST once your GST turnover reaches $75,000 or more. Below that it is your choice.
Register for GST (business.gov.au)(opens in a new tab)Step 4
Know where you stand on licences (Queensland)
Queensland Health says hairdressing, nail and beauty therapy services are not required to be licensed. Your local council may still ask a new business to let it know you have opened, so check with them too.
What business needs to know, personal appearance services (Queensland Health)(opens in a new tab)Step 5
Follow the infection control guidelines
Even without a licence, you must take all reasonable precautions to stop infections spreading. Queensland Health’s guidelines cover hand hygiene, cleaning tools and handling blood and skin cuts.
Infection control guidelines for personal appearance services (Queensland Health)(opens in a new tab)Step 6
Look at insurance
Public liability is not compulsory for every business, but some occupations need it. Sole traders are not covered by workers compensation, so think about cover for yourself too.
Types of business insurance (business.gov.au)(opens in a new tab)Step 7
Before you take on staff
Hiring a stylist or apprentice brings pay, super and award rules. business.gov.au has a step-by-step guide to hiring, with a checklist.
Guide to hiring employees (business.gov.au)(opens in a new tab)Step 8
Keep your records
The ATO says to keep most business records for 5 years: invoices, receipts and bank records.
Record keeping rules (ATO)(opens in a new tab)
General information only, not legal, tax or financial advice. Rules change, so check each official page (links checked 9 November 2026) or ask an accountant for your situation.
Your launch-day app, free to start
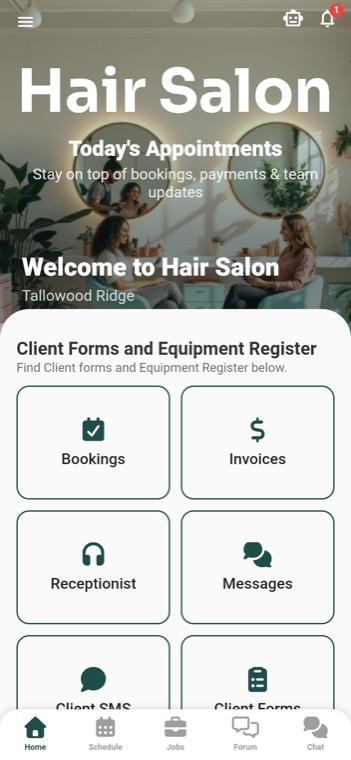
Copy our Hair Salon template into your own app, put your salon’s name, logo and colours on it, and you can take your first booking today.
Free plan: no credit card. Payments go straight into your own Stripe account, with a 2% platform fee. An AI phone receptionist is a paid add-on, see pricing.
A booking page
Every service with its price and time slots. Clients book online and pay when they book, so a no-show is still a paid chair, or pay on the day.
Pay at the chair
Send a payment request for add-ons like a toner or treatment, and the client pays by QR code or link on their own phone.
Client records
Consultation and patch-test forms, dated and kept in the app for every stylist to see.
Equipment register
Dryers and straighteners listed with their test-and-tag records.
Your team in one place
Team chat and a forum for roster swaps, stock and salon news, instead of the group text.
New booking alerts
New bookings and payments come straight to your phone.
You like it. Now what?
Here’s every step, from tapping the button to your first customer booking. You can do all of it yourself.
Get your free copy
Tap Get the free app and create your account. No credit card. We make you an exact copy of the template, every screen and feature.
Put your name on it
Type your business name. If you have a website, add it and we pick up your logo and colours. If not, upload a logo and choose your colours, or skip it for now.
Set your services and prices
In your dashboard, open Bookings and change the sample services to yours: what you offer, how long it takes and what it costs. Swap the sample quotes and forms for your own too.
Connect Stripe to get paid
Connect your Stripe account under Payments, and customer payments are deposited directly into it, with a 2% platform fee. Rather be paid in person? Set a service to pay in person and you don’t need Stripe for it.
Try it as a customer
Every booking service has a testing page. Book yourself in to see exactly what your customers will see, without making a real booking.
Bring in your team
Working with others? Invite them from Members. They get your app from the App Store or Google Play with your join link or QR code, or open it in a web browser.
Give it to your customers
Copy your booking page link and put it wherever customers find you: your website, Google Business Profile, Facebook, Instagram and your text replies. You can also add it to your website as a booking button. Customers book and pay on their phone, with nothing to download.
Grow when you’re ready
Start on the free plan. When you want more, the paid plans and the AI receptionist add-on, which answers every call in your business’s name, are on the pricing page.